Coming soon: Create and run batch presets in Theta Assist
Batch presets help you run the same AI task across many items without setting up the task from scratch each time.
An assistant editor creates a preset once, including the data source, instructions, output format and model settings. Users can then ask Theta Assist to run the saved preset by name.
Use batch presets for repeatable work such as summarising documents, categorising support tickets, reviewing records from Microsoft 365, or evaluating AI responses.
Quick links
Before you start
Batch presets are an advanced feature for repeatable, high-volume tasks.
You need:
- access to edit the assistant
- a clear task that can be repeated for each item
- a suitable source of records, such as assistant files, an uploaded data file or a tool result
- a saved and enabled preset before Theta Assist can run it
A preset has two audiences:
- Preset creators configure the task in the assistant settings.
- Preset users ask an assistant to run the saved preset.
Jobs must also be enabled for batch processing to run. See the Jobs admin guide.
Create a batch preset
- Select the assistant you want to add a batch preset to
- Click Edit assistant
- Scroll down the sidebar to the Automation and API section
- Select Batch Presets
- Select Add Preset.
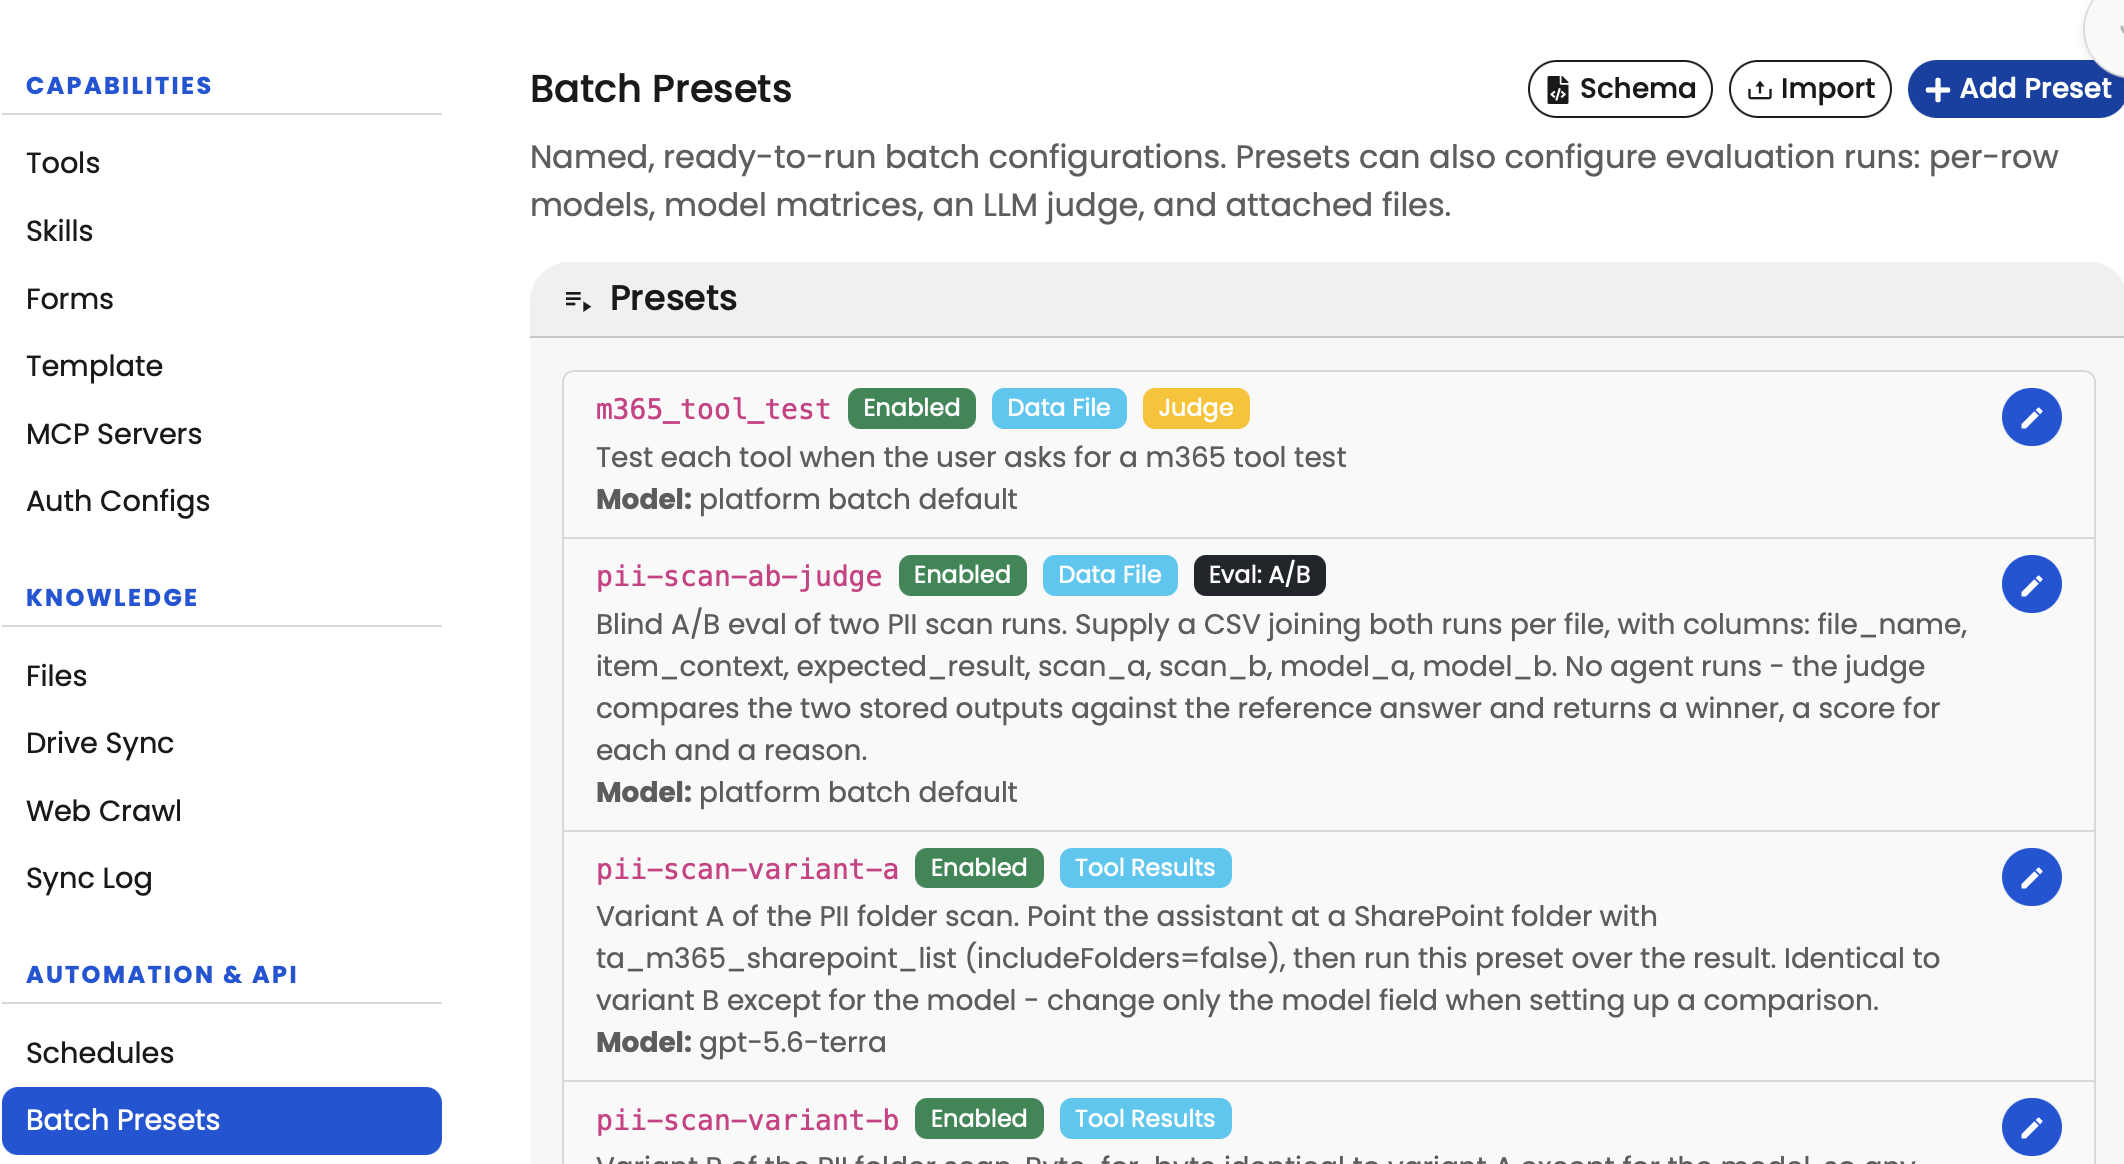
- Complete the General, Data Source and Execution sections.
- Select Save.
- Keep Enabled turned on when the preset is ready for Theta Assist to use.
Add the general details
In the General section, enter a name and description.
Name
Enter a unique preset name, such as summarise_monthly_reports.
The name is how Theta Assist identifies the preset. Preset names can contain lowercase letters, numbers, underscores (_) and hyphens (-). Do not use spaces, capital letters or other punctuation.
Description (shown to the AI)
Describe when the assistant should use the preset. Write a clear trigger statement that includes the task, the source or records it applies to, and the outcome the user wants.
For example:
Summarise each monthly report PDF when the user asks for a monthly report digest.
A specific description makes it more likely that Theta Assist will choose the correct preset instead of completing the task manually.
Preset mode
| Preset mode | Use it when |
|---|---|
| Process items with AI | You want an AI agent to complete a task for every record. |
| Judge outputs with AI | Your records already contain outputs that need scoring or comparison. |
Use Process items with AI for most batch tasks, such as summarising files or categorising feedback. Use judging when you want to evaluate existing answers, such as comparing two models or scoring responses against an approved answer.
Choose a data source
In the Data Source section, choose where the records will come from.
| Source type | What it processes | Best for |
|---|---|---|
| Assistant files | Files attached to the assistant | Reviewing or summarising a set of documents |
| Data file | Records in an uploaded CSV, JSON or XML file | Processing spreadsheet rows or exported data |
| Tool Results | Each item in the most recent MCP tool result array | Processing results from Microsoft 365 or another connected tool |
Choose the source type carefully. A preset can only run against the source it was configured to use.
Process assistant files
Choose Assistant files when each file attached to the assistant should be processed as one item.
Use this for tasks such as:
- summarising policy documents
- extracting contract terms
- reviewing CVs against role criteria
- identifying actions in meeting notes
- checking documents for personal information
Process an uploaded data file
Choose Data file when the user will upload a CSV, JSON or XML file when starting the batch. Each row or record becomes one item.
Use this for tasks such as categorising support tickets, grouping survey comments into themes, reviewing expense claims, qualifying sales leads, or generating test cases from requirements.
Map the fields that identify each record, such as its ID and display name. This makes the results easier to trace back to the original data.
Process tool results
Choose Tool Results — each element of the last MCP tool result array is an item when the preset should process results from a tool call in the current conversation.
For example, Theta Assist can list emails, files or records using a connected tool, then process each returned result as a separate item.
Important: Tool Results uses the most recent MCP tool call result in the conversation at the time the preset runs. Ask Theta Assist to retrieve the records first, then run the preset.
Use a known result shape
Use Known result shape when your preset will process a common Microsoft 365 result. Select the matching result type, such as Emails, Calendar events, Users & mailboxes, OneDrive files & folders, Excel worksheets, etc.
Theta Assist fills in the common paths for that result type. You can still change the paths afterwards.
Set the records path
The Records path identifies the array that contains the items to process. For Graph and OData results, this is often $.value. Other tools may use $.data or $.results.
Set the identifier and display name paths
The Identifier path identifies each record uniquely. It appears in the items table and results so you can trace an output back to its source. If you leave it blank, Theta Assist uses the row or item number.
The Display name path gives each record a friendly label in progress messages and results. If you leave it blank, Theta Assist uses the identifier instead.
For a typical Microsoft 365 result, use:
| Field | Path |
|---|---|
| Records path | $.value |
| Identifier path | $.id |
| Display name path | $.name |
Work with JSONPath
Paths are written in JSONPath and are evaluated against one record at a time.
For nested records, start the identifier and display-name paths inside each record. For example, if the records path is $.results, you might use $.ticket.ref as the identifier path and $.ticket.subject as the display name path.
Process Excel range results
If a tool result contains rows from an Excel range, select First row is a header when the first row contains column names. Theta Assist uses the first row as field names and processes the remaining rows.
For example, use $.values[*] as the records path. With headers enabled, you can use paths such as $.Task and $.Hours. If a header contains spaces, use bracket notation, such as $['Person count'].
If you do not select First row is a header, use column positions instead, such as $[0] and $[1].
Analyse a sample file
If you are unsure which paths to use, open Custom result shape? — analyze a sample & worked examples.
- Select Analyze sample file.
- Choose a representative CSV, JSON or XML file.
- Review the suggested paths and columns.
- Adjust the paths if needed.
The sample is analysed locally in your browser to suggest paths and columns. It is not uploaded or saved.
Set the execution options
Use the Execution section to tell the AI what to do with each item and how to return the result.
Add instructions for each item
In Instructions (per item), write instructions for an agent processing exactly one record.
Summarise the document in 3 bullet points. Include the purpose, key decisions and any actions. Call
submit_resultwith the final summary.
Write instructions for one item, not the whole batch. Explain what to review, what to extract, classify or create, the expected level of detail, and how to return the result.
Require a submitted result
Keep Require a submitted result selected for most presets. This marks an item as failed if the model does not call submit_result.
Without this setting, Theta Assist may save incomplete text as a successful result. For example, it could save “Let me check the file first” if the model runs out of turns before completing the task.
Choose an output format
| Output format | Use it for |
|---|---|
| text (markdown) | Summaries, explanations and flexible written responses |
| Structured output | Results that must use the same fields for every item |
| CSV | Spreadsheet-ready output |
Use structured output when you need consistent fields, such as category, urgency, rationale and recommended action.
Choose a model
By default, Use the platform’s batch default model is selected. This uses the platform’s Batch Processing model, configured in Admin > Settings > Auxiliary AI Models. It does not automatically use the model configured for the assistant you are editing.
Choose a different model when the task needs a specific capability, cost profile or level of reasoning.
Choose an assistant to run as
Use Execute as assistant (optional) when each item should run with another assistant’s instructions, tools and MCP servers.
For example, you could run records using a specialist document-review assistant, an assistant with Microsoft 365 tools, or an assistant configured for a particular workflow.
If you leave this blank, items run as a general agent that inherits the calling assistant’s tools.
Use per-record overrides
Open Per-record overrides — model, assistant, task prompt (optional) when individual records need different settings. This is useful for evaluation runs and mixed datasets.
Each path is read from the individual record. If a value is missing, Theta Assist uses the preset’s default setting.
Override the model
Use Model path, such as $.model, to run each record on a different model. Use this for model-comparison evaluations where each row represents a model and prompt combination.
If a record names an unknown model, only that record fails.
Override the assistant
Use Execute-as assistant path, such as $.assistant, to run each record using a different assistant. Use this to compare assistants with different instructions or tool access.
If a record names an unknown or ambiguous assistant, only that record fails.
Add a task prompt for each record
Use Task prompt path, such as $.prompt, when each record contains its own task or question.
The record’s prompt is added beneath the shared Instructions (per item). Use the shared instructions for rules that apply to every item, then use the task prompt for the specific question or task.
If you map a task prompt and leave Instructions (per item) blank, the record’s prompt becomes the full task.
Override reasoning effort and verbosity
Use Reasoning effort path, such as $.reasoning, to set the effort for each record. Supported values are minimal, low, medium and high.
Use Verbosity path, such as $.verbosity, to set the response length for each record. Supported values are low, medium and high.
Add attachments
Open Attachments — send files with each item (optional) when the AI needs supporting files to complete the task.
| Attach | What happens |
|---|---|
| Nothing | No files are sent with each item. |
| Every uploaded file, with every item | Every file uploaded to the preset is sent with every record. |
| Only the files each record names | Each record receives only the files named for that record. |
Choose Every uploaded file, with every item when every record needs the same reference material. Choose Only the files each record names when each record needs different supporting documents.
Note: Save the preset before uploading files. Exporting a preset does not include its attachments, so upload the files again after importing it.
Score outputs with an LLM judge
Use the LLM Judge (evals) section when you want a second model to score each item’s output.
Select Score each item’s output with a judge model to include a score and reason in the results.
Use this for quality assurance, model comparisons, prompt testing, regression testing, or checking answers against approved responses.
Choose the judge model
Select Change beside Judge model to choose the model that will score the outputs.
Set the score scale
Set the lowest and highest score in Score scale. The default scale is 1 to 10. You can also use 0 to 1 for pass or fail, or 0 to 4 for a labelled rubric.
Explain what each score band means in the judging criteria.
Write judging criteria
In Judging criteria, describe what the judge should assess and what different scores mean.
Avoid vague instructions such as “Score the quality”. Define the standard clearly instead.
Score factual accuracy, completeness and clarity.
10: Fully accurate, complete and clear.
7–9: Accurate with minor omissions or clarity issues.
4–6: Partly correct but missing important information.
1–3: Incorrect, unsupported or does not answer the task.
Use Insert rubric template (1–10) to start with a score-band template.
Choose what the judge sees
Use Judge sees to choose the information available to the judge.
Choose Final answer only when you want to score the completed response. Choose Full trace when the criteria need to assess how the agent worked, such as whether it selected the correct tool, used the right tool arguments, recovered appropriately from an error, or followed the required process.
Add a gold answer
Use Gold answer path, such as $.gold_answer, when each record includes an approved or ideal answer.
The judge uses the gold answer as a reference for correctness and coverage. It does not require the output to use the same wording.
Run a saved preset
Once a preset is saved and Enabled, users can ask Theta Assist to run it.
Use the preset’s exact name and state what it should process.
Run the
summarise_monthly_reportspreset on the files attached to this assistant.Use the
support_ticket_triagepreset for the CSV I uploaded.List the OneDrive folder, then run the
file_reviewpreset on the results.
Match the request to the preset source
| Preset source | What the user needs to provide |
|---|---|
| Assistant files | Files already attached to the assistant |
| Data file | An uploaded CSV, JSON or XML file |
| Tool Results | A relevant tool result in the current conversation |
For Tool Results presets, ask Theta Assist to retrieve the records first. The preset then uses the most recent tool result.
If Theta Assist starts reviewing items one by one instead, ask again using the exact preset name and identify the source.
Troubleshoot common issues
The assistant does not use the preset
Cause: The request is too vague, the preset is disabled, or the source does not match the preset.
Fix: Use the exact preset name and state the source. For example: “Run the support_ticket_triage preset on the CSV I uploaded.” Check that the preset is saved and Enabled.
The preset cannot process SharePoint or OneDrive files
Cause: The preset is configured for Data file, which only accepts an uploaded CSV, JSON or XML file.
Fix: Upload a supported data file, or use a preset configured for Tool Results or Assistant files.
The batch results are incomplete
Cause: The model did not return a final result.
Fix: Keep Require a submitted result selected and include an instruction to call submit_result.
The preset cannot find records in a tool result
Cause: The records path does not match the tool result structure.
Fix: Select a Known result shape, use Analyze sample file, or check the JSONPath values. For Microsoft Graph and OData results, start with $.value, $.id and $.name.
A record fails during a model or assistant comparison
Cause: The record names an unknown model or an unknown or ambiguous assistant.
Fix: Check the value in the record and use a valid model or assistant name or ID.
Attachments are missing after importing a preset
Cause: Attachments are not included in preset exports.
Fix: Save the imported preset, then upload the required files again.