Batch Processing Tools | Guide
Batch processing tools let you run the same AI task across many files, rows, or records at once. Use them to summarise documents, extract structured data, classify records, or review content in bulk.
This guide explains how to use batch processing tools in Theta Assist. For the admin overview of built-in tools and access control, see Built-in tools | Admin guide. For reusable saved configurations, see Create and run batch presets in Theta Assist.
Quick links
What batch processing does
Batch processing tools let an assistant run the same AI task across many items — such as files, rows, or records returned by another tool — and collect the results into one downloadable file.
Instead of processing one document or spreadsheet row at a time, you can run the task once across the full set. Each item is processed independently by its own AI agent, and the job runs in the background while you continue other work.
Before you start
- Jobs must be enabled in Theta Assist. See the Jobs admin guide.
- A system administrator must enable each batch tool in Admin > Tools > Built-in.
- The tool you want to use must be enabled in the assistant you are working with. See Adding tools and connectors to your assistant
- If the tool is restricted by an Access Profile, you must be included in that profile.
If a batch tool appears in assistant configuration but fails when you run it, ask your administrator to check the Jobs setting and tool access.
Choose a batch tool
Theta Assist currently supports 3 batch processing tools.
| If you want to... | Use this tool |
|---|---|
| Process files already uploaded to the assistant | async_start_process_files |
| Process rows in a CSV, JSON, or XML file | async_start_process_data_file |
| Process a list returned by an MCP tool | async_start_process_tool_results |
async_start_process_files — Batch process files
Processes files from an assistant's attached file library. Each file becomes one item in the batch.
Key parameters:
instructions— What the AI should do with each file.filterByName— Optional wildcard pattern to limit which files are included (for example,*.pdforreport_*). Without a filter, all files in the file library are processed.
Typical uses:
- Summarise all PDFs in a knowledge base.
- Extract key data points from a set of Word documents.
- Classify or tag a library of files.
async_start_process_data_file — Batch process data file
Processes rows or records from a structured data file — CSV, JSON, or XML. The file must already be uploaded as a thread attachment or stored in the assistant's file library.
Key parameters:
fileId— The ID of the uploaded file.format—csv,json, orxml.identifierColumn— The column or property to use as a unique identifier per row. If omitted, the row index is used.displayNameColumn— Optional column to use as the human-readable label in results.path— For JSON, a JSONPath expression to locate the array (for example,$.records). For XML, use an XPath expression. Defaults to the root.instructions— What the AI should do with each row.
Typical uses:
- Generate a personalised email or message for each contact in a CSV.
- Categorise or score each row in a dataset.
- Enrich records by applying AI analysis to each one.
async_start_process_tool_results — Batch process tool results
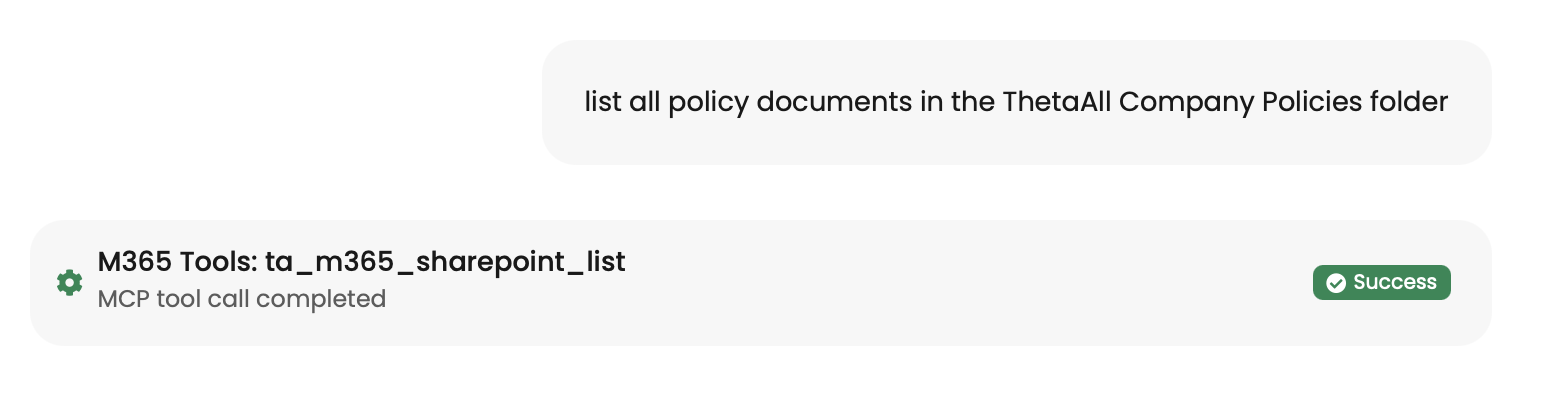
Processes the list returned by the most recent MCP tool call. Use this after an M365 or other connected tool returns a list of records — for example, files from OneDrive or SharePoint, emails, calendar items, or records from another business system.
Working with multiple data files
If you want to process multiple data files, such as Excel workbooks, store them in SharePoint or OneDrive and use the M365 tools to list the files first. Then use async_start_process_tool_results to process the returned file list.
This lets each batch item use its driveId and id to retrieve the correct file. It is the recommended approach for processing a folder or library of data files.
Key parameters:
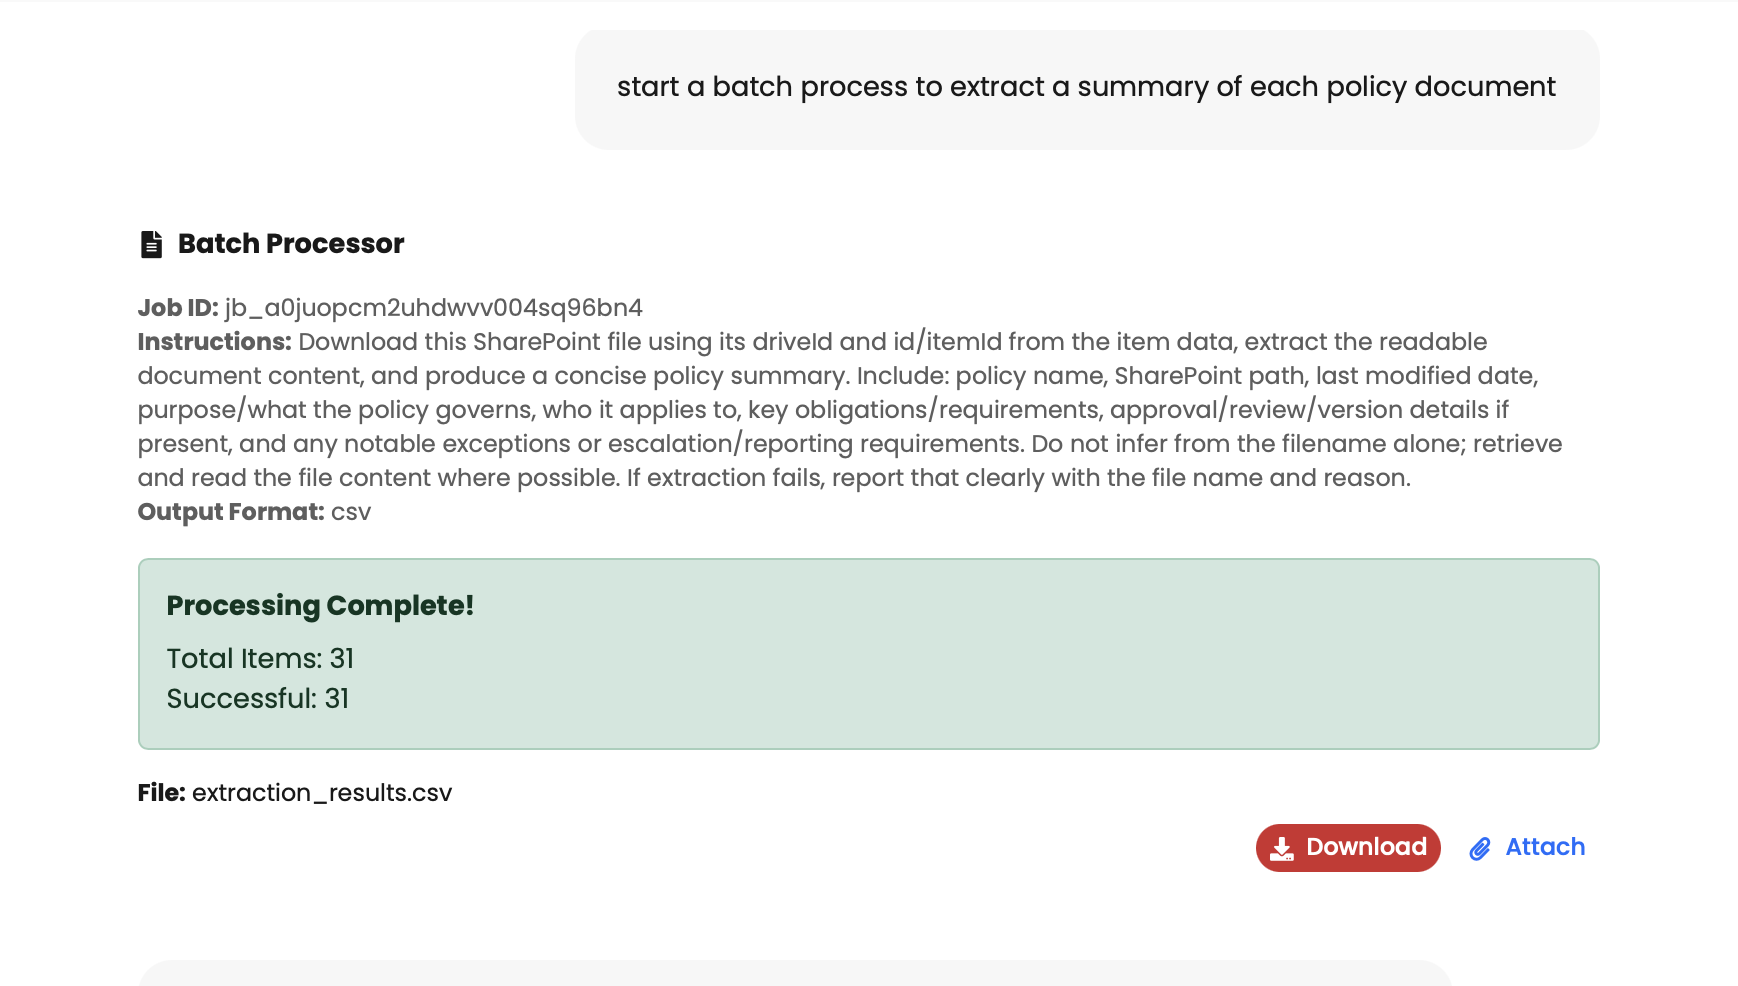
jsonPath— JSONPath expression to locate the array in the tool result (for example,$.valueor$.data). Defaults to$(root).identifierPath— JSONPath to extract a unique ID from each element (for example,$.id).displayNamePath— JSONPath to extract a display name from each element (for example,$.nameor$.title).instructions— What the AI should do with one item. Write this as a single-item instruction, not a loop. For example, write "Fetch the full file content using the driveId and id, then summarise it", not "For each file, do X".
Why this tool exists: MCP tools often return large lists. Passing the full list into context wastes tokens and can hit limits. This tool stores the result and processes each element with its own dedicated agent. Each per-item agent can use the same MCP tools, so it can make follow-up calls for that item, such as fetching full document content by ID.
Truncation handling: If the original MCP tool result was too large and was truncated, the system automatically re-fetches the full result in the background before processing begins.
Typical uses:
- List files from OneDrive or SharePoint, then have each item's agent fetch and summarise the full file content.
- Retrieve emails from a mailbox, then classify or extract key data from each one.
- List records from another connected system, then analyse each record individually.
List files & summarise example
Step 1: List the files or records you want to process using an MCP tool.
Step 2: Start a batch job using the most recent tool result.
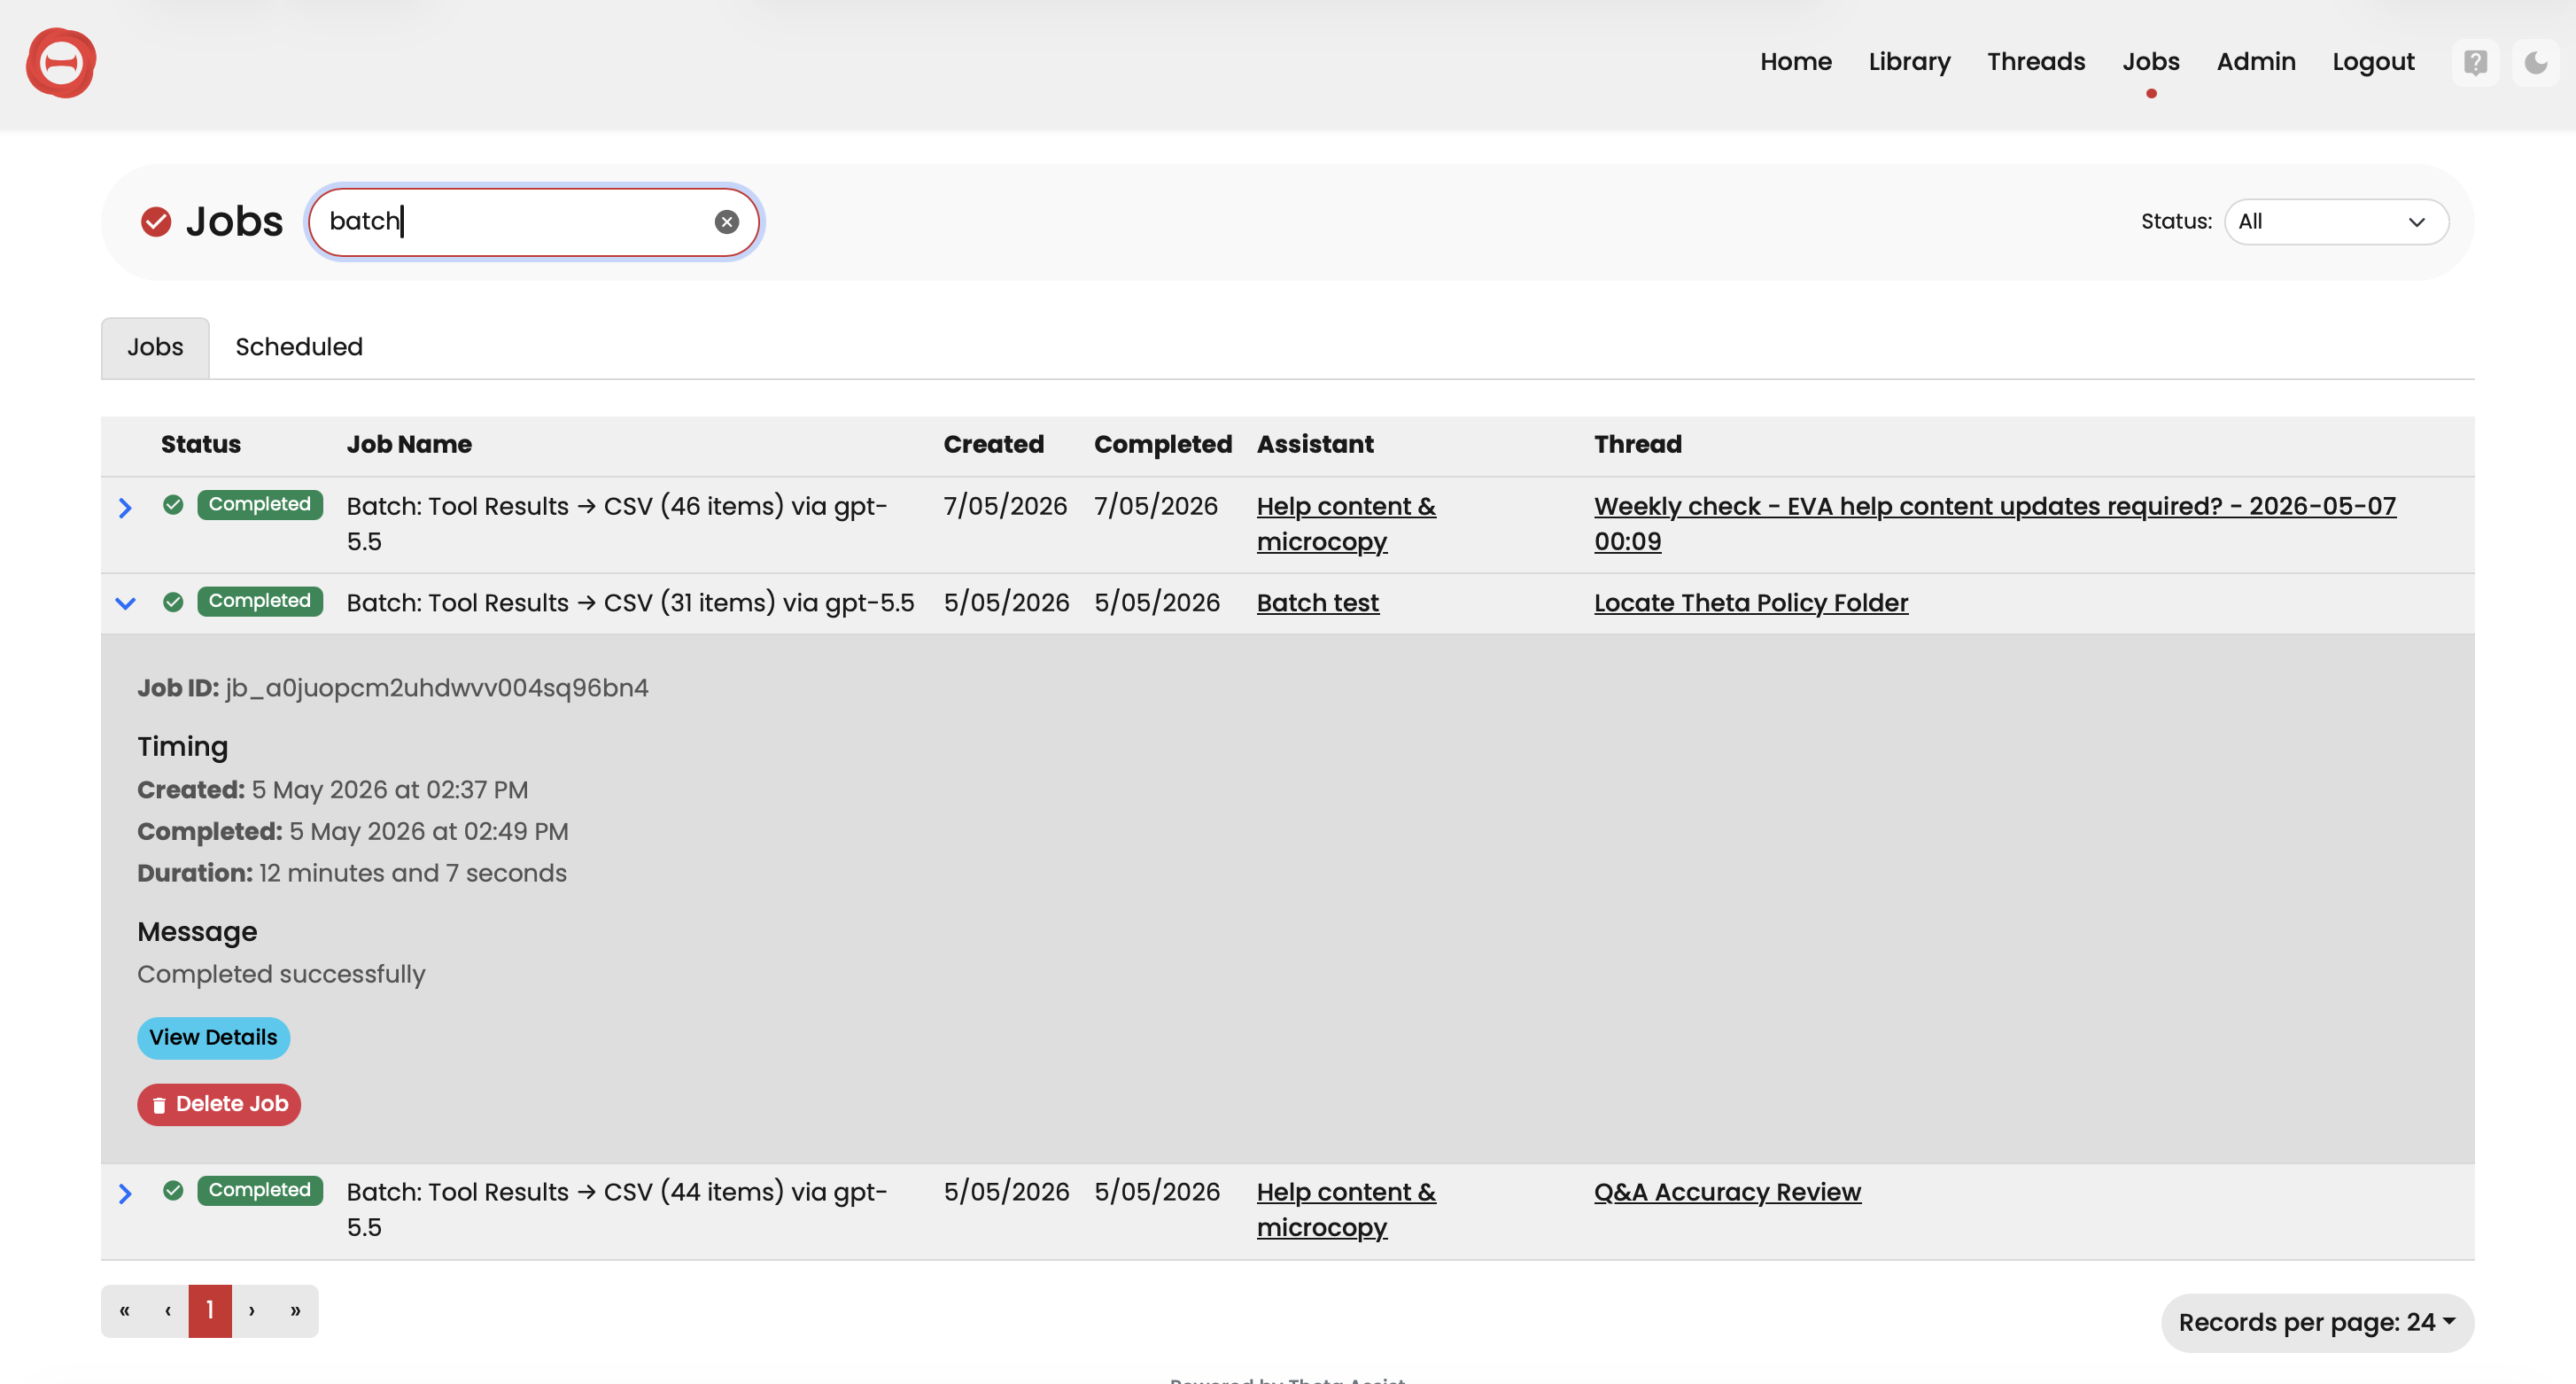
Check progress in the conversation or in the Jobs tab.
Settings used across batch tools
All three batch tools share the following optional parameters:
| Parameter | Description |
|---|---|
output_format |
How results are formatted: text, structured, or csv. Defaults to text. See the output format section below. |
output_schema |
Plain-English description of the fields to extract when using structured or csv output. Example: title: document title, summary: 2-3 sentence summary, score: confidence score 0-1. |
model |
The AI model to use for processing. If not specified by the user, the platform's default is used. |
execute_as_assistant_id |
Run each item using a different assistant's configuration. This is useful when a specialised assistant, with its own instructions, tools, and MCP servers, should handle the processing. See the section on list_assistants below. |
Choose an output format
text (default)
Results are unstructured Markdown. The AI writes whatever is appropriate for each item. The final file is a .md file. This is best for summaries, narratives, or outputs where the structure varies by item.
structured
Results are written as JSON, with fields defined by output_schema. The final file is a .json file. This is best when you need machine-readable output for downstream processing.
csv
Results are written as a CSV with column headers defined by output_schema. The final file is a .csv file. This is best for tabular data that will be opened in Excel or imported into another system. Multi-line values are replaced with a pipe (|) delimiter to preserve CSV integrity.
When using structured or csv, the output_schema parameter is required. Write it as a simple comma-separated list of field: description pairs:
name: full name of the person, email: email address, score: relevance score from 0 to 1
What happens when a batch job runs
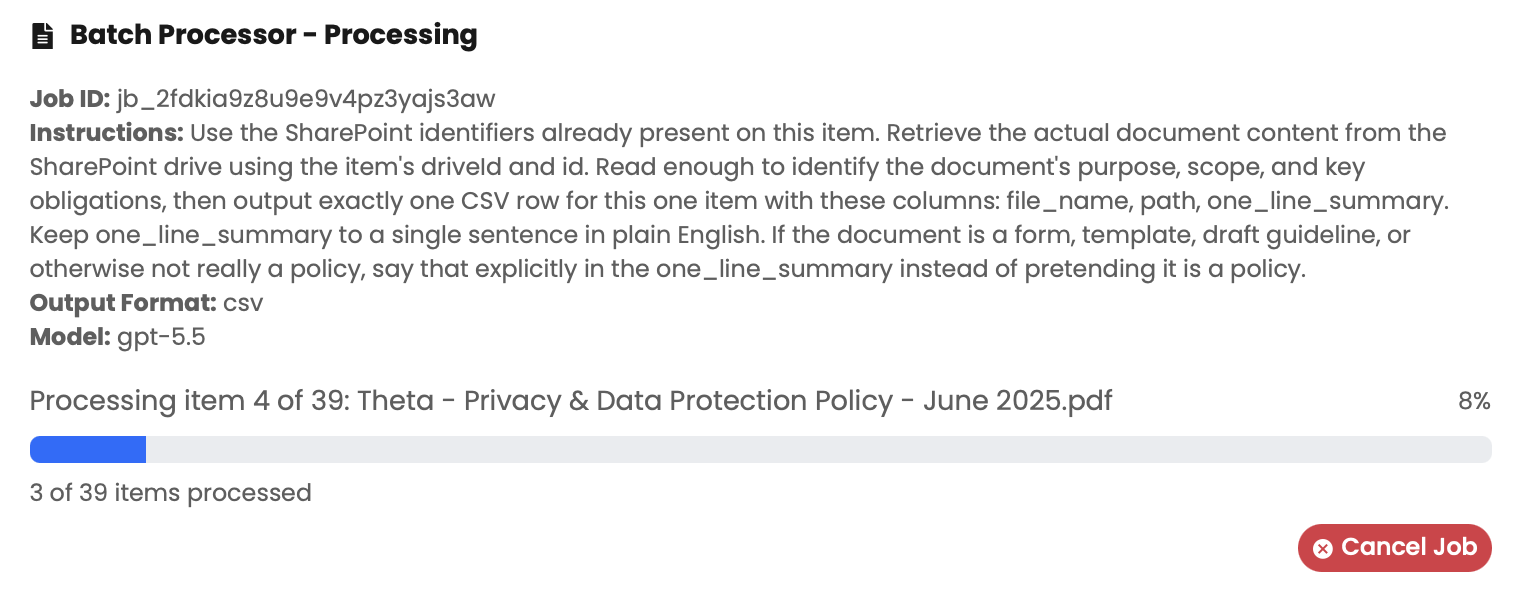
When a batch tool is called, the assistant responds immediately. It does not wait for all items to finish processing. The response contains a job reference, and the UI shows a progress widget in the conversation.
During processing:
- Items are processed one at a time in the background.
- The progress widget shows the current count, total, and percentage complete.
- You can cancel a job if you need to
- You can continue using the assistant or navigate away — the job runs independently.
When complete:
- The widget shows the final counts, including how many items succeeded and how many failed.
- A Download button appears so you can save the results file in CSV, JSON, or Markdown format.
- An Attach button adds the results file to the current conversation thread, making it available to the assistant for follow-up questions.
If an item fails:
- The job continues processing the remaining items.
- Failed items are shown separately with an error message.
- The downloaded results file includes successfully processed items.
Use list_assistants when you need a specific assistant
The list_assistants tool returns the assistants the current user has access to, with their IDs and names. It is mainly used to resolve an assistant name to an ID for the execute_as_assistant_id parameter.
When to use it:
If a user refers to a specific assistant by name — "use the Timesheet Analyser" or "run this with the Budget Forecaster assistant" — the assistant should call list_assistants to find the correct ID, then pass that ID as execute_as_assistant_id to the batch tool.
If the user says "summarise these files" without naming an assistant, omit execute_as_assistant_id and use the current configuration.
Parameters:
filter— Optional text to search assistant names, case-insensitive.
Example flow:
- User: "Process these files using the Finance Reports assistant."
- Assistant calls
list_assistantswithfilter: "Finance Reports". - Result:
{ "id": "asst_abc123", "name": "Finance Reports" }. - Assistant calls
async_start_process_fileswithexecute_as_assistant_id: "asst_abc123". - Each item is processed using the Finance Reports assistant's instructions, tools, and MCP server connections.
Common examples
If you need to run the same batch setup regularly, consider saving it as a preset. See Create and run batch presets in Theta Assist.
Summarise all PDFs in a knowledge base
Instructions: "Summarise this document in 3-5 bullet points, then list the top 3 action items."
Tool: async_start_process_files
filterByName: *.pdf
output_format: text
Extract structured data from a CSV of contacts
Tool: async_start_process_data_file
fileId: <uploaded contacts.csv>
format: csv
identifierColumn: email
displayNameColumn: full_name
instructions: "Write a short personalised intro paragraph for this person based on their role and company."
output_format: csv
output_schema: "email: email address, intro: personalised intro paragraph"
Analyse OneDrive or SharePoint files
Step 1: Ask the assistant to list files from a SharePoint library or OneDrive folder using the M365 tools.
        The result contains a $.value array with file metadata (id, driveId, name, etc.).

Step 2:
Tool: async_start_process_tool_results
jsonPath: $.value
identifierPath: $.id
displayNamePath: $.name
instructions: "Using the driveId and id, fetch the full file content, then write a 2-sentence summary."
output_format: csv
output_schema: "file_name: file name, summary: 2-sentence summary"
Process a code-interpreter-generated dataset
Step 1: Ask the assistant to run Python (via code interpreter) to generate or process data -> produces output.csv.

Step 2:
Tool: async_start_process_data_file
fileId: <uploaded or generated output.csv>
format: csv
identifierColumn: id
instructions: "Classify this record as High, Medium, or Low priority based on the values provided. Explain your reasoning in one sentence."
output_format: csv
output_schema: "id: record id, priority: High/Medium/Low, reason: one-sentence explanation"
Worked example: review procedure documents
Choose Example A if your source documents live in SharePoint and should always be reviewed from the current live version.
Choose Example B if you want to review a one-off set of uploaded files without connecting to SharePoint.
The following two examples show how to configure a full document review assistant — one where source documents live in SharePoint, and one where they are uploaded directly to the assistant. Both produce the same structured output. The main difference is how the documents are sourced.
The scenario is a quality review of a library of procedure or policy documents. Each document is checked for errors, inconsistencies, and completeness, and the results are collected into a structured dataset for triage.
Example A — Documents in SharePoint
When to use this approach: The documents are maintained in a SharePoint document library and should not need to be re-uploaded each time a review is run. The assistant fetches the current versions at the time of each run.
Assistant configuration
| Field | Value |
|---|---|
| Name | Procedure Document Reviewer (SharePoint) |
| Description | Reviews procedure and policy documents stored in SharePoint for errors, inconsistencies, and quality issues. |
| Tools enabled | async_start_process_tool_results |
| MCP server | M365 Tools |
Suggested prompt button
Button label: Review procedure documents
Prompt text:
Review the procedure documents in SharePoint using the following location:
{
  "driveId": "<your-sharepoint-drive-id>",
  "folderPath": "Documents/Procedure Library",
  "recursive": false,
  "maxItems": 100
}
Enable Auto-submit so clicking the button starts the review immediately.
Replace <your-sharepoint-drive-id> and folderPath with the values for your library. The drive ID can be found using the M365 tools or obtained from a SharePoint administrator.
System prompt
# Document Review Orchestrator

## Role

You are a Document Review Orchestrator. Your goal is to systematically review a library of procedure or policy documents and produce a structured quality report for each one.

## Workflow

### Phase 1: List documents

When the user asks you to review documents and provides a SharePoint location, call `ta_m365_sharepoint_list` using the supplied `driveId` and `folderPath`. This returns an array of file objects in `$.value`.

### Phase 2: Start batch review

Immediately after the list call, invoke `async_start_process_tool_results` with:
- **jsonPath**: `$.value`
- **output_format**: `structured`
- **instructions**: (use the Sub-Agent Instruction Set below)

### Phase 3: Summarise results (user-initiated)

When the user uploads the results file and asks for a summary:
1. Display a Markdown table with all 8 fields for every document reviewed.
2. Below the table, provide a brief analysis covering:
   - Documents that require immediate attention (critical errors or Fail status)
   - Common issues found across the library
   - Documents with missing metadata (version, date)

---

## Sub-Agent Instruction Set

Context: You are a Document Review Agent. You have been assigned ONE file from a SharePoint document library.

### Step 1: Download

Use the `itemId` and `driveId` from your input to call `ta_m365_sharepoint_download` with `outputFormat: text`.

### Step 2: Review and extract

Analyse the document content and extract the following 8 fields:

1. **document_title** — The official title from the document header.
2. **document_version** — Version number (e.g., v1.2). Use "Not found" if absent.
3. **effective_date** — The date the document came into effect. Use "Not found" if absent.
4. **overall_status** — Your overall assessment: `Pass`, `Needs Revision`, or `Fail`.
5. **critical_errors** — Any factual inconsistencies, contradictions, or calculation errors. Use "None found" if clean.
6. **formatting_issues** — Inconsistent headings, numbering, date formats, or missing sections. Use "None found" if clean.
7. **language_issues** — Grammar, spelling, ambiguous phrasing, or inconsistent terminology. Use "None found" if clean.
8. **recommendations** — The top 1-3 suggested actions, or "No action required" if the document passes.

### Step 3: Sanitise output

Before returning output, apply these rules to all strings:
- Replace smart quotes (") and curly apostrophes (') with standard equivalents.
- Replace em-dashes (—) and en-dashes (–) with hyphens (-).
- Remove non-breaking spaces, tabs, and control characters.
- Escape any double quotes inside strings as \".

### Step 4: Return JSON only

Return ONLY a raw JSON object with no markdown, code blocks, or explanation.

Schema:
{
  "document_title": "string",
  "document_version": "string",
  "effective_date": "string",
  "overall_status": "Pass | Needs Revision | Fail",
  "critical_errors": "string",
  "formatting_issues": "string",
  "language_issues": "string",
  "recommendations": "string"
}
Example B — Documents uploaded to the assistant
When to use this approach: The documents are provided as a one-off batch — uploaded directly to the assistant's file library. This is simpler to set up and requires no SharePoint connection.
Assistant configuration
| Field | Value |
|---|---|
| Name | Procedure Document Reviewer (Uploaded Files) |
| Description | Reviews procedure and policy documents uploaded to this assistant for errors, inconsistencies, and quality issues. |
| Tools enabled | async_start_process_files |
| MCP server | None required |
Upload the documents to the assistant's files before running a review.
Suggested prompt button
Button label: Review procedure documents
Prompt text:
Review all procedure documents uploaded to this assistant using batch processing.Enable Auto-submit so clicking the button starts immediately.
System prompt
# Document Review Orchestrator

## Role

You are a Document Review Orchestrator. Your goal is to review all documents uploaded to this assistant and produce a structured quality report for each one.

## Workflow

### Phase 1: Start batch review

When the user asks you to review documents, immediately call `async_start_process_files` with:
- **output_format**: `structured`
- **instructions**: (use the Sub-Agent Instruction Set below)

You do not need to list files first — `async_start_process_files` works across all files in the assistant's file library automatically.

### Phase 2: Summarise results (user-initiated)

When the user uploads the results file and asks for a summary:
1. Display a Markdown table with all 8 fields for every document reviewed.
2. Below the table, provide a brief analysis covering:
   - Documents that require immediate attention (critical errors or Fail status)
   - Common issues found across the set
   - Documents with missing metadata (version, date)

---

## Sub-Agent Instruction Set

Context: You are a Document Review Agent. You have been given the content of ONE document from the assistant's file library.

### Step 1: Review and extract

Analyse the document content and extract the following 8 fields:

1. **document_title** — The official title from the document header.
2. **document_version** — Version number (e.g., v1.2). Use "Not found" if absent.
3. **effective_date** — The date the document came into effect. Use "Not found" if absent.
4. **overall_status** — Your overall assessment: `Pass`, `Needs Revision`, or `Fail`.
5. **critical_errors** — Any factual inconsistencies, contradictions, or calculation errors. Use "None found" if clean.
6. **formatting_issues** — Inconsistent headings, numbering, date formats, or missing sections. Use "None found" if clean.
7. **language_issues** — Grammar, spelling, ambiguous phrasing, or inconsistent terminology. Use "None found" if clean.
8. **recommendations** — The top 1-3 suggested actions, or "No action required" if the document passes.

### Step 2: Sanitise output

Before returning output, apply these rules to all strings:
- Replace smart quotes (") and curly apostrophes (') with standard equivalents.
- Replace em-dashes (—) and en-dashes (–) with hyphens (-).
- Remove non-breaking spaces, tabs, and control characters.
- Escape any double quotes inside strings as \".

### Step 3: Return JSON only

Return ONLY a raw JSON object with no markdown, code blocks, or explanation.

Schema:
{
  "document_title": "string",
  "document_version": "string",
  "effective_date": "string",
  "overall_status": "Pass | Needs Revision | Fail",
  "critical_errors": "string",
  "formatting_issues": "string",
  "language_issues": "string",
  "recommendations": "string"
}
Choosing between the two approaches
| SharePoint (Example A) | Uploaded Files (Example B) | |
|---|---|---|
| Source | SharePoint document library | Files uploaded to the assistant |
| Always current | Yes — fetches live versions | No — files must be re-uploaded when updated |
| Setup complexity | Requires M365 tools and a drive ID | No external connections needed |
| Best for | Ongoing, repeatable reviews of a maintained library | One-off reviews of a fixed document set |
| Batch tool used | async_start_process_tool_results |
async_start_process_files |
Related articles
- Built-in tools | Admin guide — admin overview of built-in tools and access control
- Create and run batch presets in Theta Assist — save and reuse repeatable batch tasks
- Jobs | Admin Guide — enable Jobs for background processing