Scheduled jobs | User guide
Quick links
What scheduled jobs do
Scheduled jobs run an assistant automatically at a time you choose. Use them for repeatable work such as daily briefings, weekday reports and recurring file-processing tasks.
When a schedule runs, Theta Assist sends the saved prompt to the assistant, uses its configured tools and connected services, and saves the result in a thread.
Scheduled jobs require the Jobs feature to be enabled by your administrator.
Set up a scheduled job
- Open the assistant you want to schedule.
- In the left-hand menu, select Schedules under Automation & API.
- Select Create scheduled job.
- Complete the schedule details.
- Select Save.
The schedule becomes active immediately and runs at the next matching time.
| Field | What to enter |
|---|---|
| Job name | Use a clear label, such as “Daily morning brief”. This helps you identify the schedule on the Jobs page. |
| Initial prompt | Enter the instructions the assistant should follow each time the schedule runs. |
| Schedule | Use the visual builder to choose the frequency, days and time. Choose weekdays when the task should run Monday to Friday. Set the schedule to Never to save it without running it automatically. |
| Run mode | Choose how the assistant should complete the job each time it runs. |
| Time zone | This is set from your browser when you create the schedule and is shown for reference. |
Pause a schedule
To keep a schedule but stop automatic runs, edit it and set the schedule to Never. You can still run it manually from Jobs > Scheduled.
Write an effective initial prompt
Scheduled jobs run without back-and-forth, so the initial prompt needs to contain everything the assistant needs to complete the task.
- State the task clearly. Say what the assistant needs to do.
- List steps in order. Number multi-step tasks.
- Include exceptions. Explain when the assistant should stop or take a different action.
- Define the output. Specify whether the result should be a thread summary, report, email or another outcome.
- Set completion rules. Explain what to do when no results are found or a step fails.
- Keep standing instructions in the system prompt. Use the initial prompt for the recurring task only.
Choose a run mode
Choose how Theta Assist completes the scheduled job.
- Agentic loop (default): The assistant works through the task in steps. A completion checker prompts it to continue until the task is complete. Reasoning is off. Choose a creativity preset; new jobs use Low by default for predictable, repeatable results.
- Reasoning only: The assistant uses its configured reasoning and completes the task in one pass. There is no completion checker. Use this for simple tasks that can reliably finish in a single response.
- Agentic loop with reasoning: The assistant uses reasoning and works through the task in steps. A completion checker runs after each step. Use this for complex tasks that need more thorough analysis. This option takes longer and costs more.
Recommended: Use Agentic loop with Low creativity for most unattended scheduled jobs.
Manage your schedules
Go to Jobs > Scheduled to view your schedules.
Each schedule shows its description, last run, next run and linked assistant. A paused schedule shows Never.
| Action | What it does |
|---|---|
| Run now | Starts a one-off run immediately, regardless of the saved schedule. |
| Edit | Changes the name, schedule or initial prompt. |
| Delete | Permanently removes the schedule. |
After a schedule runs, open the related job to view the full thread and output.
Worked example: daily planner
This example creates a weekday morning brief that checks Teams, email, meeting transcripts and your calendar, then emails you a structured summary.
Assistant set-up
| Setting | Value |
|---|---|
| Assistant name | Daily planner |
| MCP server | M365 Tools |
| System prompt | Define the output structure and standing formatting rules. If the assistant sends an email, include the email format it should use. |
Schedule configuration
| Field | Value |
|---|---|
| Name | Daily morning brief |
| Schedule | Every weekday at 7:00 am |
| Initial prompt | Use the example below. |
Initial prompt
Use the M365 tools to help me plan my day.

1. Check my Teams chats for open loops, including unanswered requests, commitments, blockers and follow-up actions.
2. Check unread overnight emails. Ignore transactional emails unless they appear critical. Ignore Microsoft 365 quarantine notifications.
3. Review accessible meeting transcripts from the previous day and identify actions assigned to me or commitments I made.
4. Review my upcoming meetings for today and suggest preparation needed. Ignore daily recurring meetings.
5. Prepare a prioritised summary with links where available.

When complete, email the summary to me.
How it works
- At 7:00 am each weekday, Theta Assist sends the prompt to the Daily planner assistant.
- The assistant checks the configured Microsoft 365 sources.
- It prepares and sends the summary.
- The completed run appears in Jobs. Open the related thread to review the result.
Worked example: document processing pipeline
Scheduled jobs can run a multi-step workflow, such as finding documents, processing them in batches, sending results to another system and notifying stakeholders.
- List files from SharePoint or OneDrive.
- Start a batch processing job to analyse each file.
- Wait for the batch job to finish.
- Send the results to an external endpoint, such as a Power Automate flow or API.
- Send a completion summary by email.
| Capability | Tool required |
|---|---|
| List or read SharePoint and OneDrive files | M365 Tools MCP server |
| Process documents in batches | Batch processing built-in tools |
| Send results to an external endpoint | cURL Executor MCP server |
| Send an email notification | M365 Tools MCP server |
All tools must be enabled by your administrator and added to the assistant. Configure the cURL Executor with appropriate URL restrictions and credentials for the destination system.
Advanced: trigger a scheduled job from Power Automate
Use an advanced trigger when you want Power Automate to start a saved scheduled job in response to an event, rather than waiting for its normal run time. For example, you could start an assistant when a new email meets selected criteria.
Before you start
- Set up the assistant with the tools and instructions it needs.
- Create and save the scheduled job on that assistant.
Step by step
- Open the assistant and select Schedules.
- Create or open the scheduled job you want Power Automate to start.
- Select Save. The Advanced trigger option becomes available after the schedule is saved.
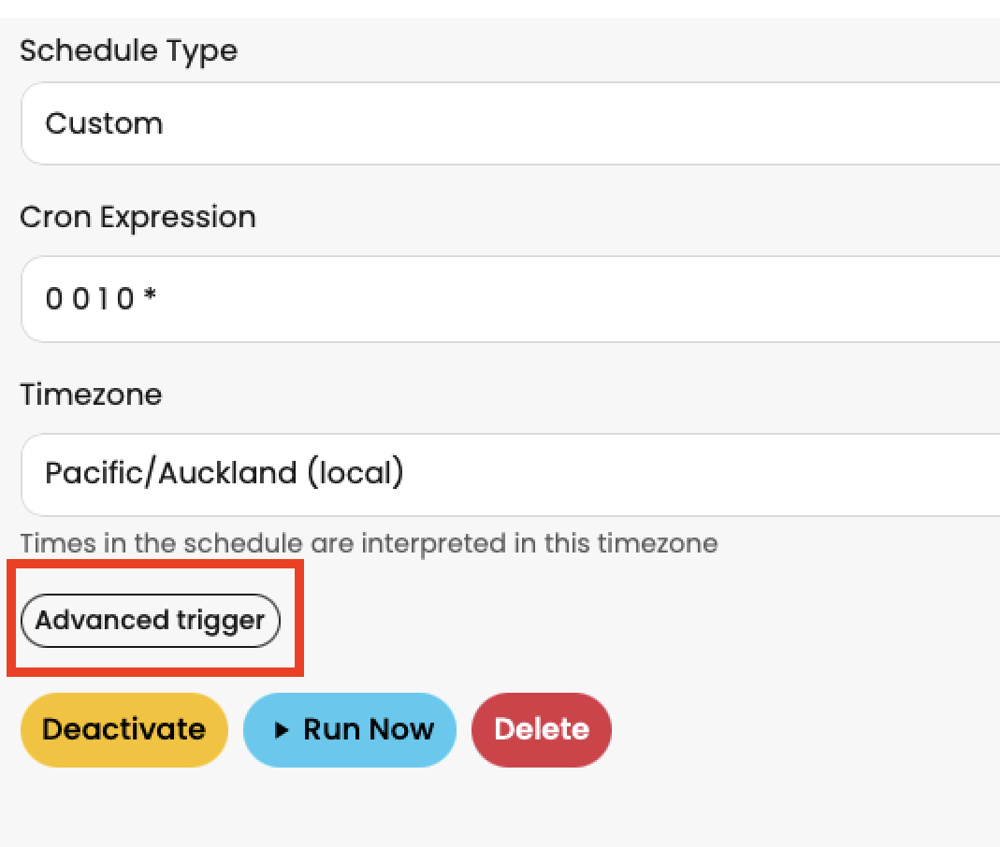
- In Advanced trigger, select Create trigger URL.
- Copy the trigger URL and the assistant API key.
- In Power Automate, create a flow with the event that should start the job, such as receiving an email that matches your criteria.
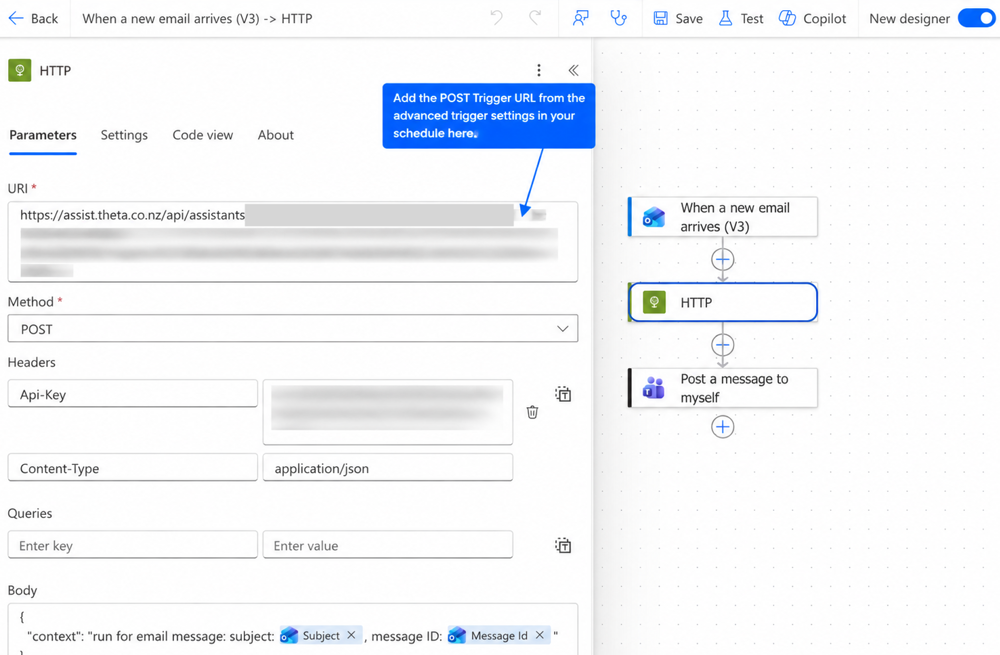
- Add an HTTP action that sends a request to the trigger URL.
- Add the assistant API key using the authentication method shown in the schedule’s advanced trigger settings.
- Test the flow and check Jobs to confirm that the job started.
When the flow starts the job, Theta Assist can return a shared link to the completed thread. Use this link in a later flow action, such as sending a Teams message, email or approval request.
The shared link opens the full job thread and its output. Recipients must sign in to access it.
Important: The job runs with the permissions and access of the person who created the schedule. Review the assistant’s connected tools and data access before enabling an external trigger.