Connectors & MCP | End user guide
In this article
What are connectors?
Connectors and MCP servers allow your assistant to connect to external data sources and tools, for extra capabilities.
Connectors & MCP servers available will depend on what has been set up by your organisation, and what has been enabled on the assistant you are using.
Want to enable for your own assistant? check out this guide
Types of connector
Broadly, there are two types of connector:
Built-in connectors
Pre-configured integrations with popular services that follow the OpenAI Connectors specification. Currently these are all read-only - allowing you to retrieve information, but not write back to the source application.
For example, OpenAI Microsoft 365 Connectors:
- Microsoft Teams: Read Teams, channels, and basic properties
- Outlook Calendar: Read calendar events and availability
- Outlook Email: Read inbox messages and email metadata
- SharePoint: Access OneDrive and SharePoint sites and documents (read-only)
Dropbox and Google Workspace also have pre-built connectors.
Model Context Protocol (MCP)
MCP is an industry-standard protocol for connecting assistants to external data sources and tools. This is typically used for deeper or custom integrations.
What can you do with connectors?
General ideas
Some ideas to try on an assistant with the OpenAI Microsoft connectors or M365 tools enabled:
- Catch me up on my project <name> emails and messages for the last week.
- Prepare me for my next meeting – fetch related files and recent emails.
- Find the document called <name> across SharePoint, Teams and OneDrive.
- Look for messages that mention <name> in my Teams chats and emails.
- What does my week look like next week?
- Can you find a word doc created by me that mentions <x/y/z>?
- For this afternoon's workshop, list attendees confirmed vs unconfirmed
- From this list of attendees, summarize the responses in this file <link to excel of form responses>
- On which days in the next 2 weeks could I schedule a 3 hr workshop?
Work with protected files
WARNING working with encrypted files is currently not working.
Because you are authenticated (as you) when you use, for example, a Microsoft connector, you can access and retrieve information from encrypted/protected files, if you have the relevant permissions.
A file that is protected (restricted access, indicated by a padlock icon) is encrypted, and normally can't be read by an assistant when it's uploaded as a thread or assistant file. With an authenticated connector, the file (assuming you have the relevant permissions) can be accessed by the assistant.
Authenticating to connectors
Before an assistant can access your data, you must authenticate to the required connectors.
Visual Indicators
Wrench Icon: Located in the message input box
Red dot: One or more connectors require authentication
No red dot: All connectors/tools are authenticated

Authentication steps
- Click the wrench icon in the message input box
- A modal opens showing:
- Configured connectors
- Authentication status for each
- Authenticate buttons for unauthenticated connectors
-
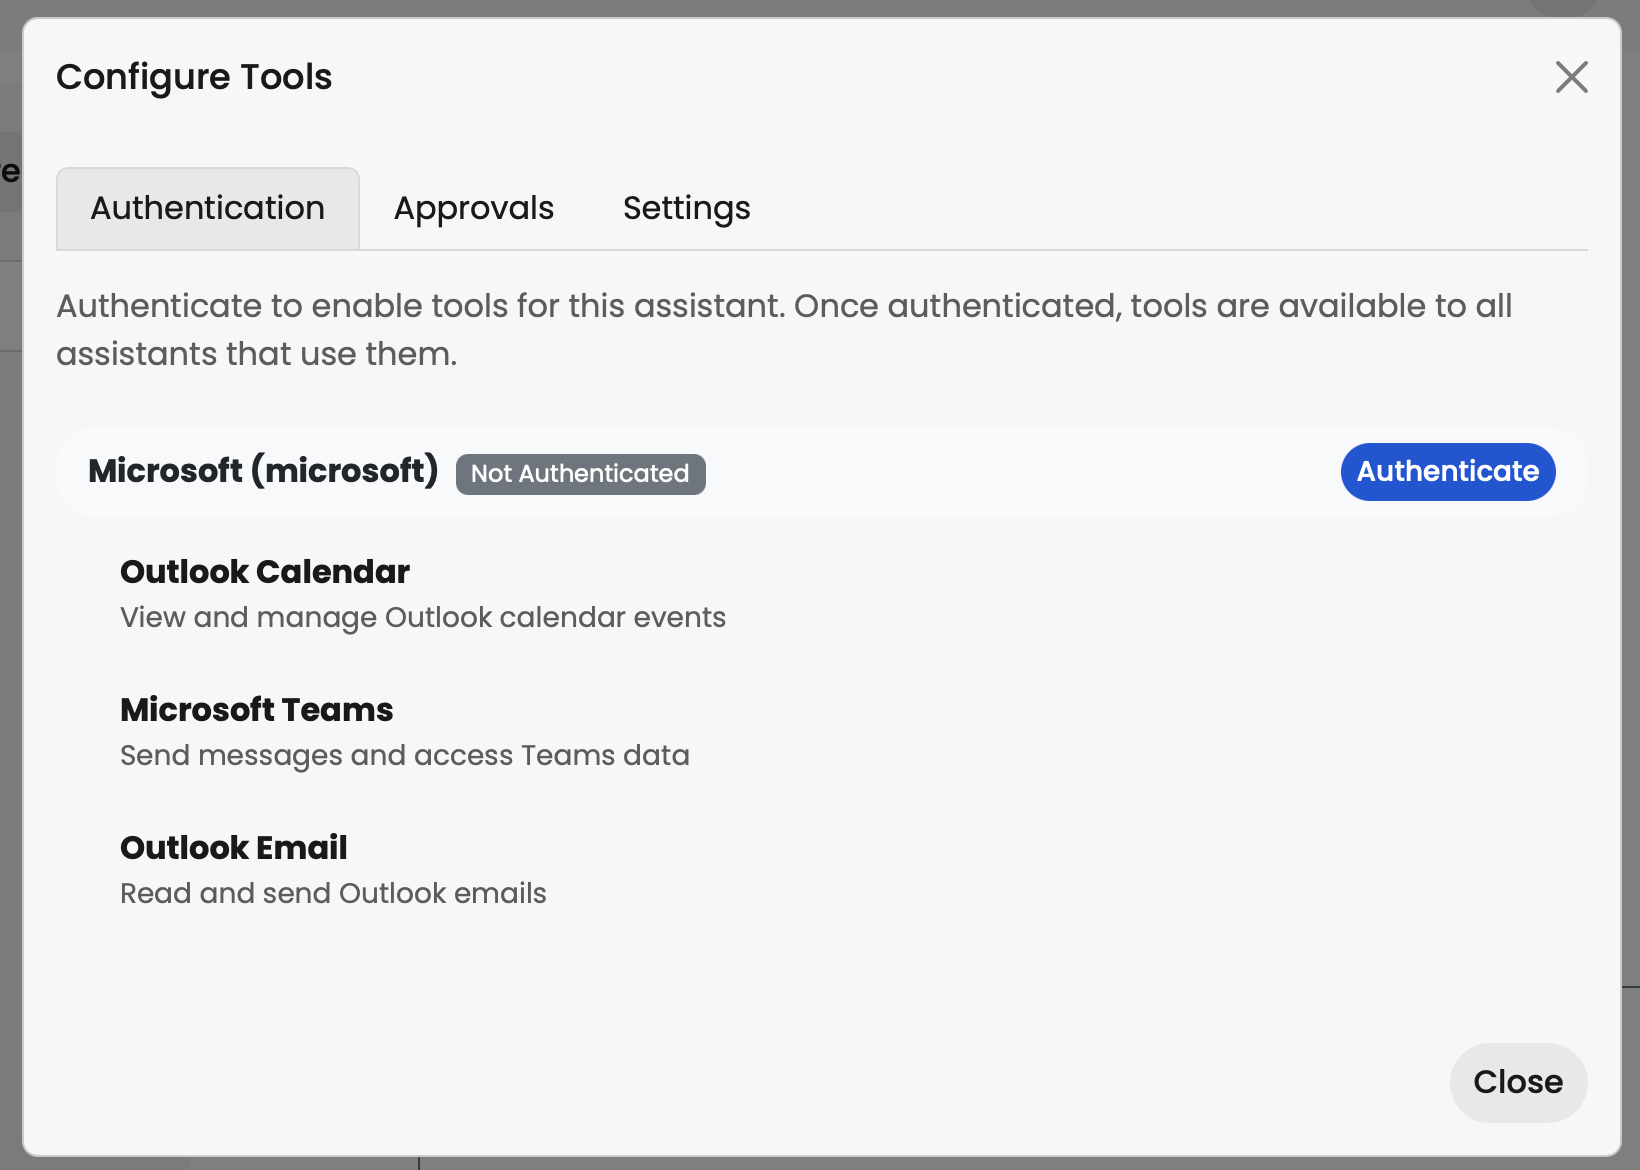
- Click Authenticate next to the connector you want to connect
- A new browser window opens with the service provider's login page (Microsoft, Google, Dropbox). This appears as a pop-up so make sure pop-ups are enabled.
- Sign in with your credentials
- Review any permissions detailed in the authentication pop-up and authorize if prompted
- Browser redirects back to Theta Assist. Authentication status is indicated:
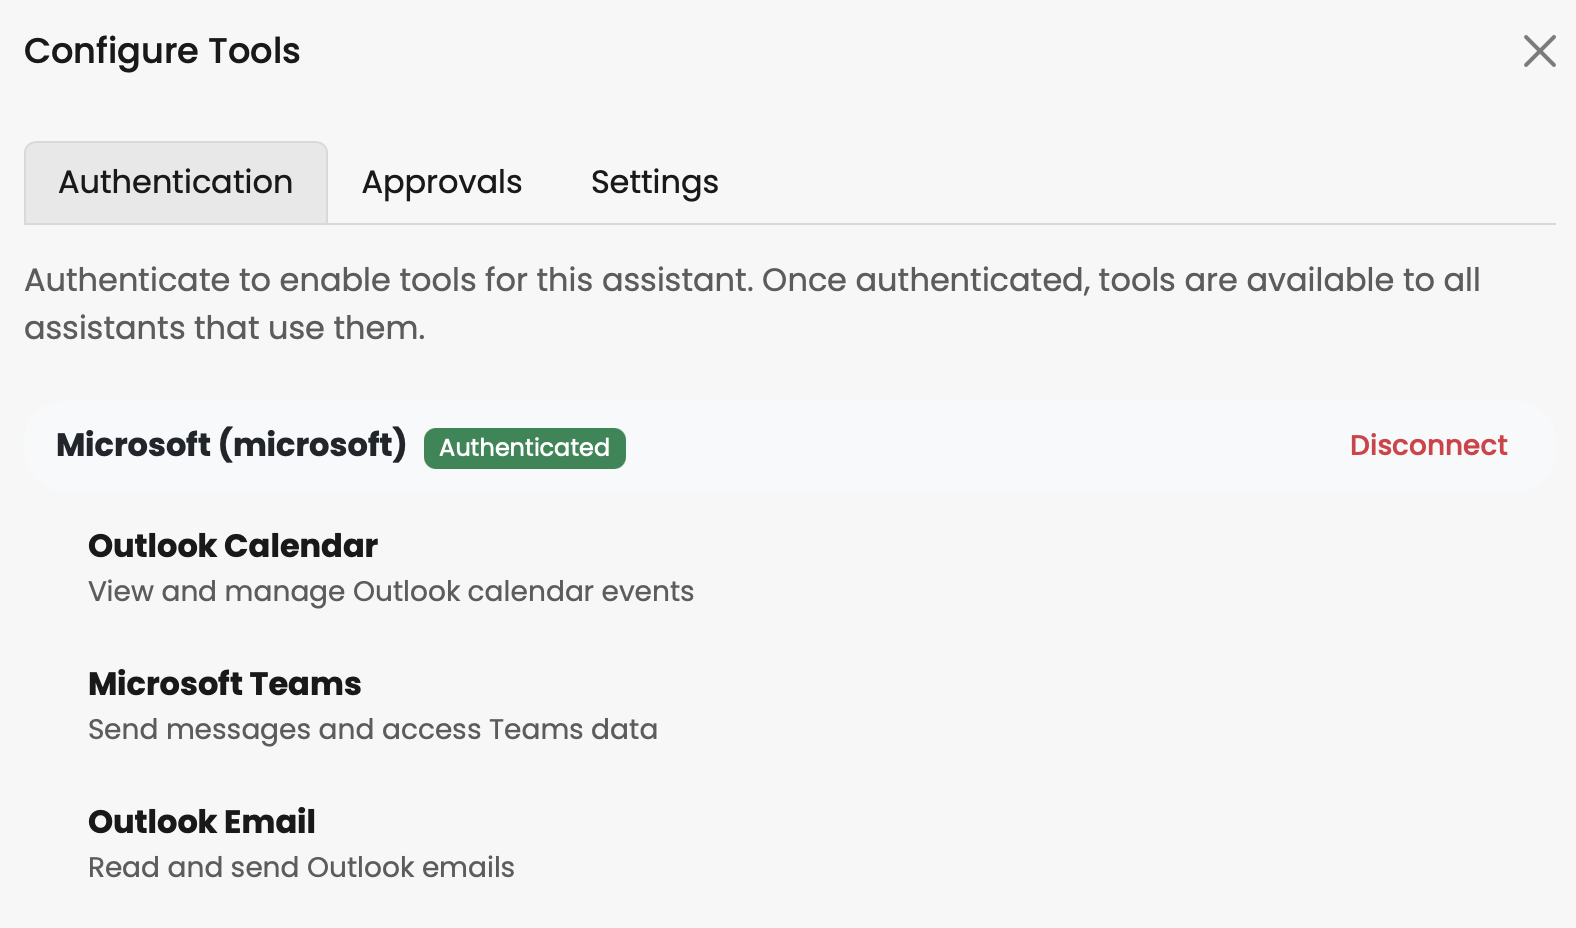
- Close the authentication window
- Return to Theta Assist - the red dot should disappear
Authentication troubleshooting
Authentication fails:
- Verify you have access to the service (Microsoft 365, Google Workspace, etc.)
- Check that your browser allows pop-ups
- Ensure you're signing in with the correct account
- Contact your administrator if authorization is denied
Red dot persists:
- Refresh the page
- Click the wrench icon to verify authentication status
- Re-authenticate if needed
Token expires:
- Some tokens expire after a period of time
- The red dot will reappear when re-authentication is needed
- Follow authentication steps again
Approving tool actions
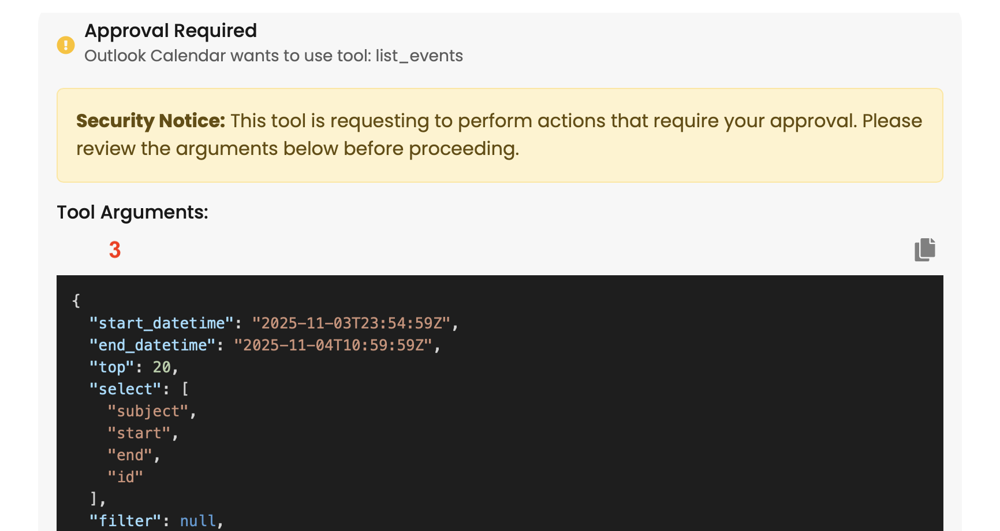
When an assistant wants to use a tool that requires approval, you'll see an approval request.
Approval request display
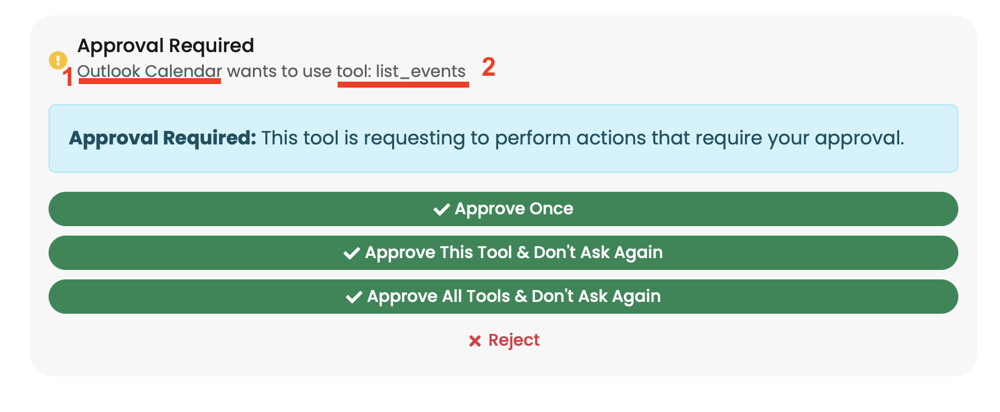
Approval requests appear in the conversation as special message blocks showing:
- Server name: Which connector or MCP server
- Tool name: The specific tool being called (e.g., "search_emails", "list_calendar_events")
- Arguments: The parameters being passed to the tool (e.g., search query, date range)
- Note: You'll only see the arguments if Show technical information for tools is enabled
- To enable: Click the wrench icon → Navigate to the Settings tab → Toggle on Show technical information for tools
Approval options
You have four choices:
1. Approve Once
- Approves this single tool call
- Next time the same tool is called, you'll be asked again
- Best for: One-off operations, reviewing each call
2. Approve This Tool & Don't Ask Again
- Approves this call and saves your preference
- Future calls to this specific tool (e.g., "search_emails") will execute automatically
- Other tools from the same connector will still require approval
- Best for: Frequently used tools you trust
3. Approve All Tools & Don't Ask Again
- Approves this call and saves a blanket preference
- All tools from this connector/MCP server will execute automatically
- Best for: Fully trusted connectors
4. Reject
- Denies this tool call
- Assistant receives an error and may try alternative approaches
- Your approval settings are unchanged
Managing approval preferences
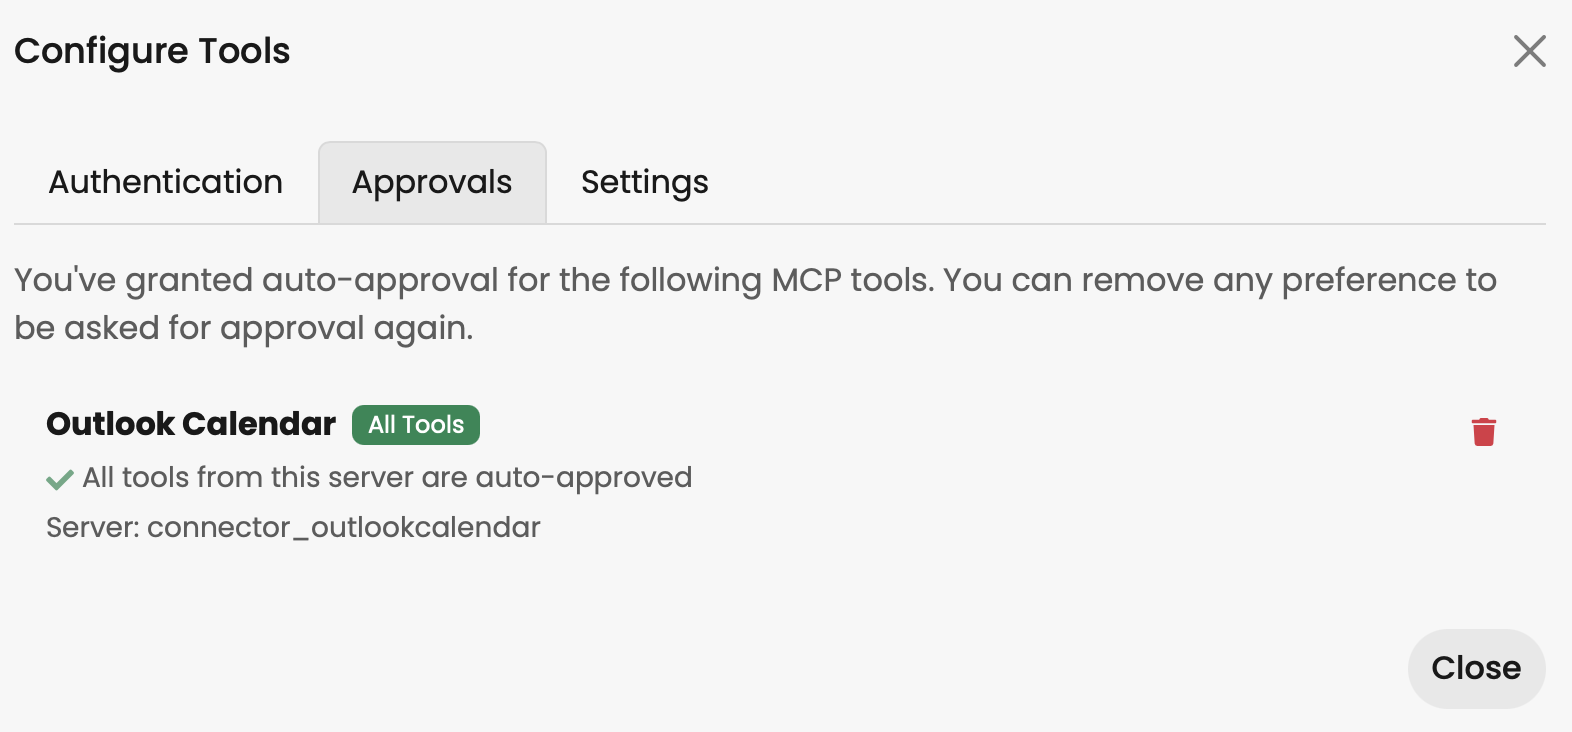
You can view and remove your saved approval preferences.
Viewing Preferences
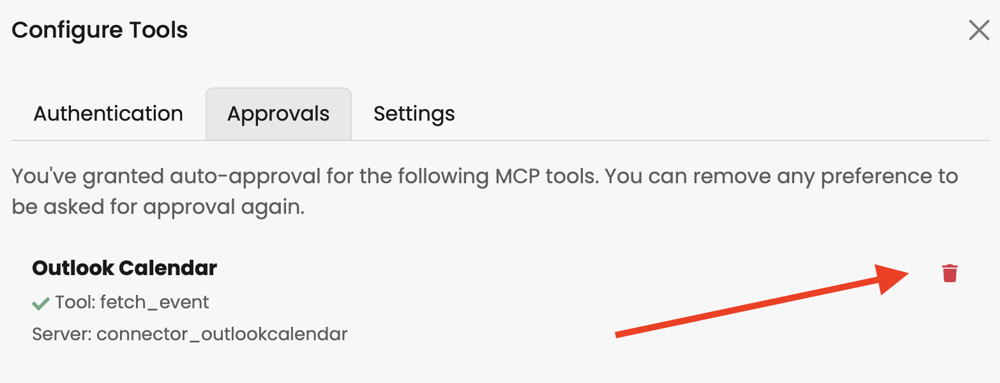
- Click the wrench icon in the message input box
- Navigate to the Approvals tab
- View a list of your saved preferences showing:
- Connector/MCP server name
- Tool name (or "All Tools")
Removing preferences
To re-enable approval prompts for a tool:
- Click the wrench icon in the message input box
- Navigate to the Approvals tab
- Click the delete icon (bin)
- Confirm
- The next time the assistant calls this tool, you'll be asked to approve again